Showing posts with label #ornaments. Show all posts

Thursday, November 10, 2016

Craft Lightning Christmas Edition 2016

Time for another Craft Lightning.... crafts in 15 minutes or less for Christmas.

I always love to see what everyone comes up with.

It is a glorious fall where I live and I have gathered some sweet acorns for this quick craft.


Clean them and be sure you have a cap and an acorn for each ornament.


Drill a hole in the cap of each acorn.

Cut a piece of wire for each one about two inches long.

Twist the wire to make a loop as shown.


Push the ends of the wire together and slide them down through the acorn cap.

Once through, open the wires on the inside.


Use a hot glue gun to glue the acorns into the cap.

Gather your glitter and glittering glue.

I really do the stuff Martha Stewart makes for this.


Brush on the glue, and sprinkle with glitter.

Tap off excess.


Allow to fully dry and add a little twine hanger.


These make great gift toppers or ornaments.


A quick tip:  You can either buy processed acorns or gather your own.

If you gather your own, it is best to bake them in a craft dedicated toaster oven at 150 degrees for about 30 minutes to kill any critters dwelling within.

Check out the other fun fun quick holiday crafts by clicking below.


Thanks for stopping by....

Monday, May 16, 2016

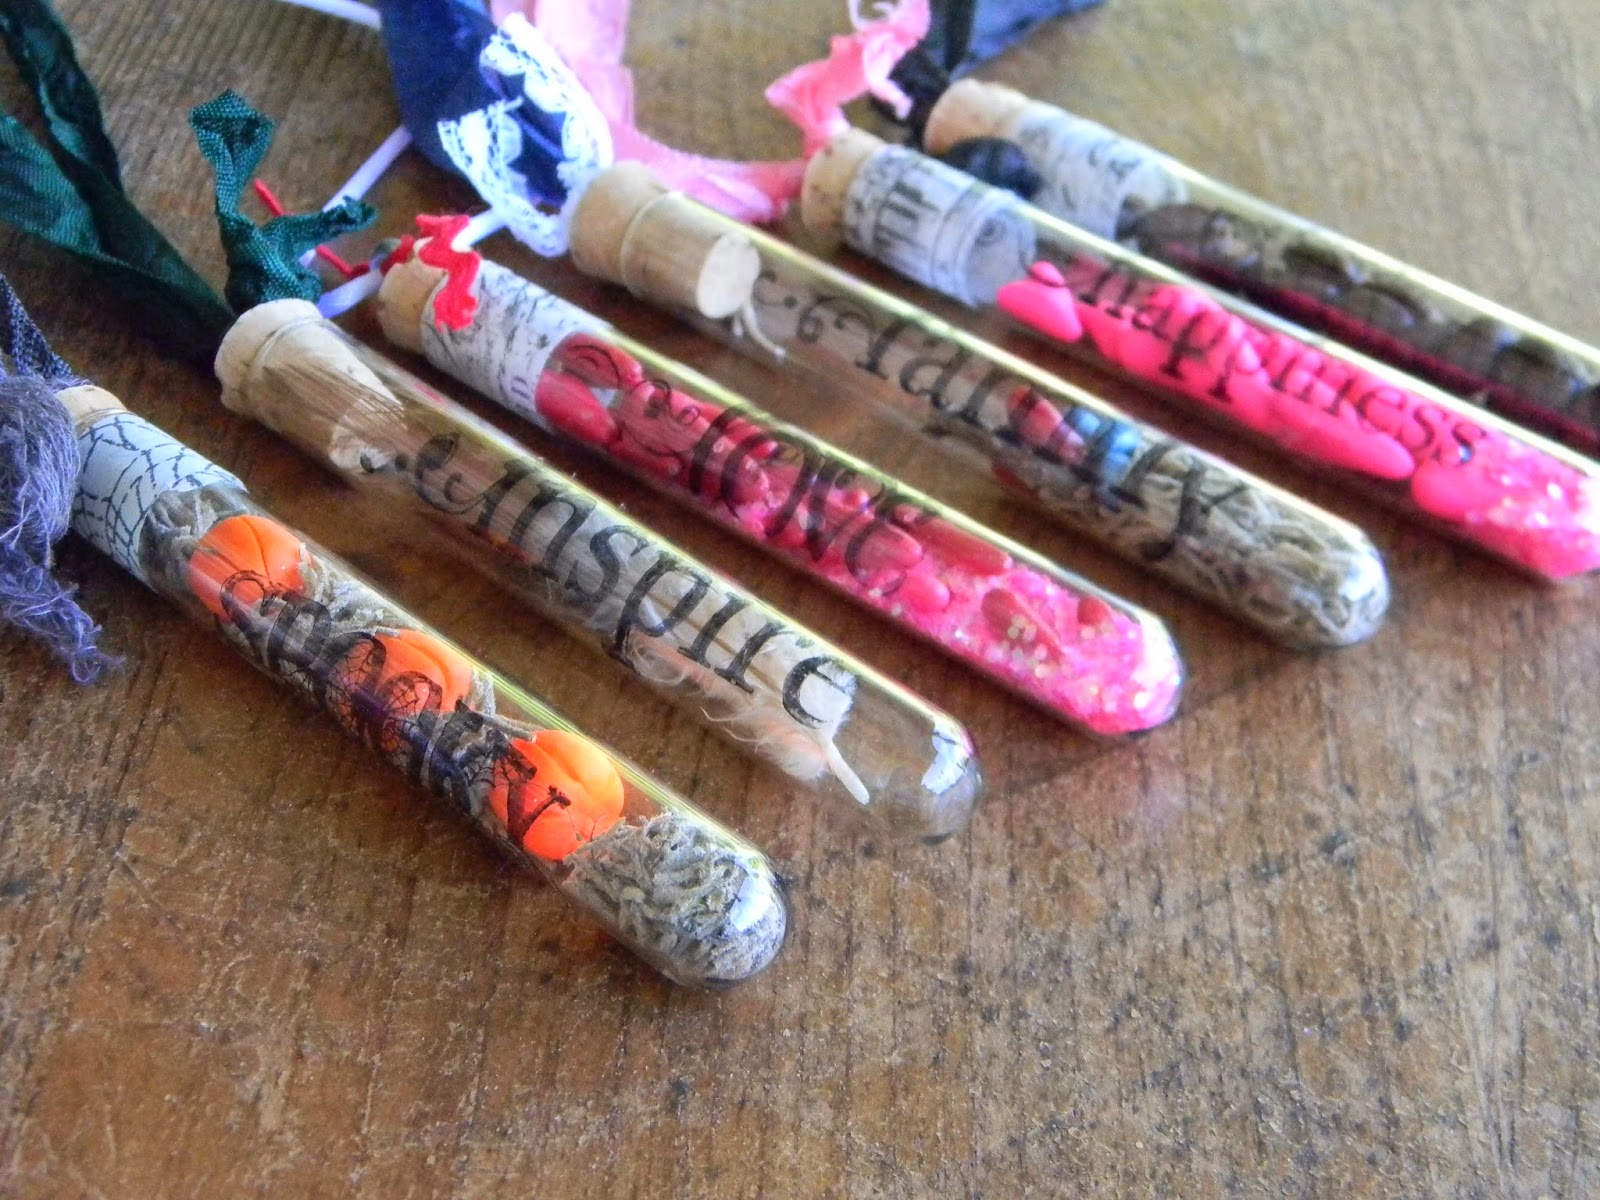
Test Tube Necklace/Ornamants

Just a quick peek today...

I love turning test tubes into wearable art or ornaments.....


How easy and fun are those?

Thanks for stopping by....


Thursday, December 10, 2015

Jingle-Corn Ornaments

Today I share one sweet little ornament...

A Jingle Corn...


Have a great Thursday!

Thanks for stopping by...

                  Linking up with these great blogs.

Wednesday, November 11, 2015

Craft Lighting Holiday Edition 21015-Snowman Snowglobe Ornament


Well, Craft Lightning is back...


It's the holiday edition, so let's make a 15 minute or less ornament...

One of the things I love to stock up on in the fall is clear glass ball ornaments.

They beg for all sorts of creativity.

These have a tiny pompom snowman inside.


Glue two white pompoms together.

Paint a toothpick orange. 

 Cut off the end for a nose and glue it in place.


Use a pair of tweezers to squeeze the body. 

 Once you are sure it will fit, add a drop of hot glue to the bottom and carefully guide it into the ball without touching the glue on the sides.


Hold it down to the bottom until the glue cools.


Add some fake snow or glitter.


Replace the cap and add some jute for hanging.

Ta dah!

You could make enough for your whole tree in an evening.

Or one for everyone on your gift list.


Be sure to visit our hosts for all the other great projects!


Thanks for stopping by...

Friday, March 6, 2015

Yarn Wrapped Candy Cane Ornament

Time for another quick ornament. 

Have you been keeping up?

This one starts with a piece of heavy wire.

I use rebar wire from the fencing section of home improvement stores.

You can also use an old wire hanger.

Cut the wire and bend it into a candy cane shape.

Then I used hot glue to glue the end of some heavy red and white yarn I had.


Then I wrapped it continually around the wire, gluing every so often.

When I got the whole thing covered, I  glued the end to the candy cane.  

Once the glue was dry, I trim the end with scissors.

I make a mixture of hot water, coffee and ground cinnamon.

 I soak the ornaments in it for about 30 minutes.

  I remove them and hang them over a drying rack in my garage until they are dry.


Now they are ready for the tree or a package.

Thanks for stopping by...

Sunday, February 8, 2015

Grubby Snowman Ornaments


Are you keeping up with the ornament ideas I am sharing each month?

Not to worry...

I will do a great round up post before Christmas in case you have missed any.

Today is a sweet Grubby  Country Snowman.


Believe it or not, this little guy starts with a couple white pom poms.

Use a glue gun to glue three together in a snowman shape.

Paint a toothpick orange.

Snip off the end and glue it in the top pom pom for a nose.

Add two black beads for eyes with the glue gun as well.

Mix some white school glue, water, strong coffee and ground cinnamon.

Put on a pair of latex or vinyl gloves to protect your hands.


Roll the snowman around in the glue mixture and sqeeze it into the pom poms.

Squeeze to remove excess glue.  

Lay on a plastic tray to dry.  

I usually wait overnight and then turn them and let the last side dry completely.


Tie a little strip on for a scarf and glue a button on as well.

For the string hanger, I use crochet thread and a needle to pass the string through the snowman's head.

I cut the string and tie a knot.

I also make a variation with one large pom pom.


It makes a cute snowman head ornament.

The nose is made from orange Sculpey clay this time and the eyes are bigger half round eyes.


I add a little garland around some for a halo.


I use the same method to add the string to hang it.


I usually make a whole pack of pom poms at a time.

I just change the details for each one.

Thanks for stopping by...

Friday, February 6, 2015

Cinnamon Stick Tree Topper

Time to share another ornament.

Are you creating as I am sharing?

If you are, you will be ready December 2015 with lots of ornaments for your tree or gift giving.

Today is a bit different.

This is a tree topper.

I could not reach the top of my little outdoor tree so I took pictures among the branches, but it is a tree topper.

This star is made from cinnamon sticks, raffia, some wire and a pinecone.


You will also need a hot glue gun, glue sticks, and a hot glue mat.


Arrange your cinnamon sticks in your desired pattern on your hot glue mat.

I used a variety of lengths.

Once you like the pattern, add hot glue to the center.

I added lots so it got a little messy.


Before the glue cools, add your pine cone to the front.

This helps camouflage the glue and makes a pretty and natural center.


I almost forgot...

Add a long piece of heavy wire to the bottom of the star before the glue hardens.


You can bend it around a cylinder or cone shape first.

If you forget, it can be done after but it is more difficult.

 Let the glue cool and harden completely.

I usually wait at least 30 minutes.

Peel it off the mat.

To cover some of the messy glue, I wrapped raffia around the center.

I used several strands and left the ends long.
 
I just tied the ends in a knot to secure.


It has such a great natural look to it.


I think these would be fun on small outdoor trees as well.


Imagine trees decorated for the birds with these on top....


Thanks for stopping by....


Linking up with these great blogs...

Sunday, February 1, 2015

Grubby Primitive Hearts for Your Valentine's Day

I think most people have a defining style...

Contemporary...

Modern....

Primitive...

Country...

Cottage chic...

Funky....

Up cycled...

When you see their work, you know immediately that it is them.

I am not sure if this is true of me.

I like all the styles listed above and make things that fit all of those categories.

My daughter describes what we do as "eclectic".

I think she nailed it...

So today I wanted to share these sweet primitive hearts for Valentine's day.

I have made them for years but I still love them.


I start with inexpensive muslin.

Draw your desired heart shape on a piece of card stock.

Cut it out.

Trace the shape on a doubled piece of muslin.

I usually do a whole bunch at the same time.

Use your sewing machine to sew the shape.

Leave about an inch open to stuff it.

Cut out the heart and turn it right side out.


Stuff it with polyfil.

Hand sew the opening closed.

Then comes the fun part.

Paint the fabric with latex or acrylic paint.

I like to buy oops paint wherever they mix paint. 

 This used to be very inexpensive.

That is no longer true in my area.

It is still cheaper than having your paint mixed and if you find a color you like, you are lucky...

While the heart is still wet, roll it in a pan of ground cinnamon.

Set it to dry.

Once it is dry, brush off the loose cinnamon.


Add a little homespun strip and embellish.

I like to use naturals: cinnamon sticks and rose hips are favorites.

Then you can fill a bowl or send them in an envelope as a sweet surprise for someone you love.

You can also paint them with other colors before you roll them in cinnamon like the brown one below.


A little primitive love for you this winter day...

Thanks for stopping by....

Tuesday, January 27, 2015

Crepe Paper Streamer and Cinnamon Stick Ornaments

You may remember before Christmas I did a couple cinnamon stick ornaments.

This one had a handmade wreath.


And this one had a little bleached bottle brush wreath.


The tutorial for making them is here.

Today I wanted to show you a few I made with crepe paper rosettes.

I must confess...I love rosettes.

When I start making them, I make tons.  

I use some right away and save some for projects down the road.

That is what happened here.


I have an extensive collection of colors.

Seems like that is something that frequently ends up at yard sales, thrift stores and flea markets.

I never pass up a roll or two at a good price.


To make mine, I actually hand sew the crepe paper.

I gently pull the thread to gather it and tie it off.


Then I glue the two ends together.


I give mine a spin in some glue and a roll in mica flakes.

I find the easiest way to do this is to place some white glue in a plastic container lid.

I hold the rosette so just the edge gets rolled in the glue.

Then the mica flakes are in another bowl I roll it in.

I find that to be the fastest and easiest way for me.


This crepe paper is actually two toned.

I die cut or punch a shape from vintage sheet music and roll the edges in glue and mica as well.


Sweet...


You can see this one has a mottled look on the sheet music...

One of those cool accidents.

I had these on my front covered porch waiting to be photographed.

We had some windy snow showers.


Apparently the snow blew in on these  and where they got wet, the color bled through from the crepe paper.


It happened to this one too.


This one actually has two different pieces of crepe paper sandwiched together.


I adore the vintage look of these pieces.

I hope you like them too...


Thanks for stopping by...

Linking up with these great blogs...