Showing posts with label trees. Show all posts

Thursday, September 29, 2016

Art Jewelry Elements: Tree Challenge

I am a huge fan of all the Talent gathered over at Art Jewelry Elements.

I am talking Talent with a capital T.

They generally offer a challenge each month and invite others to play along.  

I have on occasion and am doing so again this month.

The challenge this month is trees.

Well, I knew this would be the perfect challenge for me.

A while back I made a tree stamp from polymer clay.


And here are the new, naked beads.


It is one of my all time favorite stamps to use.

I love how the beads and components look.

So I knew I could use some of those for this challenge.

So here you go....

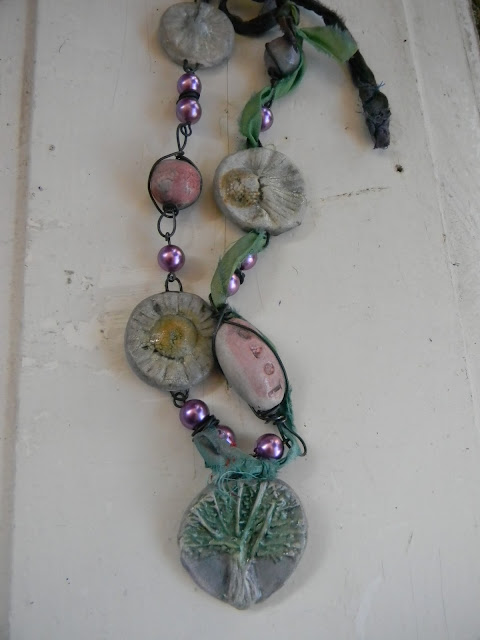
A Fairy Tale Forest necklace...


Here is one of those tree beads all dressed up...


And a little woodland fox too...


The key focal and magic bead are just what this necklace needs.


But then I had to make a fairy forest too.

   Flowers say fairy to me.

So I added some polymer beads and flower focals made from real flowers.


And last but not least, this little tree has a bee friend and a vintage inspired focal.


Join the team for more tree-inspired goodness:

Jennifer Stout Cameron

Lesley Watt

Jenny Davies-Reazor

Laney Mead

Niky Sayors

Cooky Schock

Cathy Spivey Mendola

Caroline Dewison

And the other guests:

Karin Grosset Grange

Merja Sundstrom

Cindy Martin Shaw

Allison L Norfleet Bruenger

Melissa Trudinger

Kathy Lindemer

Gloria Allen

Shai Williams

Tammy Adams

Mona Arnott

Terry Del Signore

Thanks for stopping by....

Wednesday, February 11, 2015

Simple Sweet Valentine Gift Bags


I made some valentine bags for my daughter's friends.

They are a wholesome, outdoorsy bunch so I wanted the bags to be simple and natural.

I am pleased with the results...

I wanted them each to be unique but I stuck to just a few punches and materials.


Changing the paper colors or adding a paper doily changes the look just enough...


A feather from the chickens is a great natural touch.


My nephew had this tree punch and I have been in love with it forever. 

When he moved, he gave it to me...

Thank you!


I love the heart arrow.

It starts with a twig and two punched hearts.

I punched the holes in the bag and slid the stick in place before splitting a real feather and gluing on the fletchings.


I love how it turned out.


This one is just a heart on a stick...


This one was a variation on the arrow but with a heart for fletchings this time.


The paper fletchings were easier to glue than the real feather.


I love the double twigs as a bag closure.


Even the back of this one is cool where the twigs cross.


Here is a heart rose...


A couple more of those tree punches....


These subtle shades are my favorite....


Last, but not least, there are the owls...


Each is slightly different.


The first one is this little guy where his beak is actually formed by trimming the bag.

I think he's my favorite.


I hope everyone likes their little treats...


Thanks for stopping by....


Monday, January 19, 2015

A Couple of Cards to Make...

Another post with handmade cards....

I tend to create designs that use paper scraps.

I keep my paper scraps in a couple of clear plastic shoe boxes.

Anything that does not get used in a card making session goes into the boxes when I clean up.

This means the next time I make cards, new items get paired together.

The first card today starts with a printed card blank.

I usually pick those up on sale or clearance.

They save a step of adhering a printed background.

I added an embossed red scrap.

I punched several flowers from tissue paper and crumpled them up.

Then I smoothed them out, layered them and glued them in place with a great big rhinestone for the center.

I stamped my greeting on a scrap of white cardstock.

I love the look of a little banner so I trimmed out a v of paper from the left side.

Pop dots are my best friend when card making.

I added the banner to the card with a couple to add dimension.

To finish it off, I glued another punched flower and small rhinestone to the greeting.


You can do any occasion or theme with the basic design.

Often if I am making cards, I will do a variety with the same format.

It saves time once I get going.

The next card uses little paper scraps to make a sweet banner.


Add a blue background a little smaller than your card.


Freehand cut a cloud shape from white card stock.


Cut it in half (It will do 2 cards).


Glue the half cloud to the top of the card and stamp the greeting of your choice.


Clip little triangles from paper scraps.


Glue them in an arc.


Cut a piece of cotton twine and tie a bow on each end.


The last card today uses a few die cuts.

I die cut a tree and embossed it first.

Then I punched a few circles and embossed them.

I tore a piece of green paper that was the same width as the card for grass.

Then I just glued them all together.


I hope you saw something you can use.

Sometimes the simplest thing can inspire me:texture, patterns, shapes, color combinations....

Thanks for stopping by....