Showing posts with label recycling sheets. Show all posts

Thursday, December 18, 2014

Bracelet Makeover Round Up


Christmas is right around the corner.

If there are a few gals on your list that you have not finished shopping for, try a few of these quick and easy bracelet up cycles.


For most of these, I started with plastic bangles.

A couple used metal bangles but you can use whatever you have on hand or pick up.


These pretty bangles are just updated with some vintage buttons.

You can find the directions here.


These are essentially the same but I used cheap earrings and removed the posts.


This fun shabby chic cuff uses recycled sheets and takes longer to locate the sheet and tear strips than it does to make the cuff.

Tutorial here.


These are my favorites.


I used sheets that we dyed with RIT dye to get these fantastic colors.

But you can use whatever you have on hand.


 These would be great for a wedding party too.


And the last one just uses washi tape to dress up the bangles.


For the most part, it will take longer to assemble all the supplies than it will to make the bracelets.

An hour or two will produce enough to make a dent in that gift list.

Have fun!

Thanks for stopping by...

Linking up with these great blogs...

Monday, November 24, 2014

Mason Jar Monday #4 Sweet Treats in a Rosette Snowman Jar

It's that time again....

Today's Mason Jar Monday is simple and sweet.

I used a vintage jar and zinc lid.

I made 3 white muslin rosettes.


My muslin is from thrift store sheets. 

 I buy the ones they call "drop cloths" because of a stain or two....

There are tutorials all over the place for making the rosettes.

Essentially start with a strip of muslin.

  I like torn edges.

Tie a knot on one end.

Start to wrap around the knot and turn it every so often.

For these, I actually stitched them every couple of wraps but you could glue them.


I made them three different sizes: 1 for the head, and 2 for the body.

I stitched all three together.


I added a little strip of stained cheesecloth for the scarf.

I like the ratty bit of primitive it adds...


Then I glued mine on to  the side of the jar.


I only used a couple dots of glue so I can take it off later.


I filled mine with peppermint marshmallows but you can use anything you want.


It would make a great gift or just look great on your counter to hold goodies....

Thanks for stopping by....

Linking up with these great blogs....

Saturday, September 13, 2014

Fun Shabby Chic Bangles from Old Sheets...A DIY Tutorial...

Easiest Shabby Chic bracelet tutorial....

EVER!


Start with plastic bangle bracelets and some fabric strips.


These are from old floral sheets from the thrift store.

 These same 4 sheets have fueled other projects I have shown you.

The skirt on this dress form for the garden made from chicken wire...


She looks so pretty in the wildflower strip.


You can read about her (and her friends) here.

Anyway, back to the shabby chic bracelet...

Cut your fabric strips (after they are ripped from the sheet).

Mine were about 6 inches long.

And remove any loose threads.


Then tie them on the bangle.

Just keep tying until the bracelet is full.

Done!

Can you believe it?

You could add fun color with some squirts of dye.

Or leave it like it is...


These would be the fastest, easist gift ever...

You can do a your whole list of co-workers in an evening while watching tv.

And I love handmade gifts best.

They would also be a super easy gift for a bridal party....


What are you waiting for?

Go get started.

Thanks for stopping by...

Linking up with these awesome blogs.

Tuesday, September 9, 2014

Rose Bangles from Scrap Fabric Strips


This summer, my daughter had a blast learning to dye fabric.

You can read about it here.

She then used those strips to make a fantastic Shaggy Raggy Rug.

You can see how here.

When she was finished, she still had a lot of strips left so I asked if I could use a few.

She said sure.

I had a great idea.

All I needed were the fabric strips, plastic bangle bracelets, and some hot glue.


To begin, wrap the fabric around the bangle. 

 Leave a tail about 1 1/2-2 inches long so when you get back to that spot, you can tie the ends in a knot.


I showed you the bracelets on my workbench here.


The next step is just to twist and wrap the fabric around.

I run my glue around the outside edge and then wrap the fabric around it.  

Then I repeat and just keep going until all the fabric is secured around the rose.  

Sometimes I twist and turn the fabric and sometimes, not so much.


The colors my daughter chose are luscious and refreshing.


They all make me think of the beach....


The purple is such a great accent to the blues and greens...


This blue might be my favorite...


No, maybe this one...

Only one way to solve it...

Wear them all!


Sadly, I cannot.

I have a big wrist and hand and these are too small.

I will have to find some larger bangles to make my own set...


I do love these, though...

Hoping someone else falls in love with them as well...

They would make gorgeous wedding bracelets for the bridal party....


Thanks for stopping by....

I will be offering any 2 of these bracelets in the Swap and Tell Link Party at Tarnished Royalty....

Linking up with these great blogs.

Saturday, August 2, 2014

Dying in the Yard....


 I love that my daughter is a creative person.

She is very logical and bright but also creative.

So, she decided she wanted to make a rug for the fair.

She needed fabric to tear in strips.

I was hesitant to rip great fabric we just bought into strips when it could be used for something else.

I also did not want to go spend more money on fabric than 3 rugs would cost.

So I suggested we use some old sheets I got at the thrift store and dye them.

Such soft muslin and the price was very right.

She agreed and chose some dye colors that she wanted.

Then we spent the afternoon with her learning to dye fabric.


  She wanted blues, green, and purple.


I love her color choices.


We mixed all her dyes.

I love ice cream buckets for this. 

 They are big enough to accommodate most things I dye.

 They have lids so unused dye can be saved til later.


She tore her sheet into equal size pieces. 

She wanted light and dark of each color.

It is key to wash and wet the fabric first. 

 Washing removes sizing.

  Wetting makes sure they dye takes more evenly.


That purple was so deep and beautiful.


She worked all afternoon.

She waited 30 minutes before removing each piece of cloth.

She rinsed until the water ran clear.

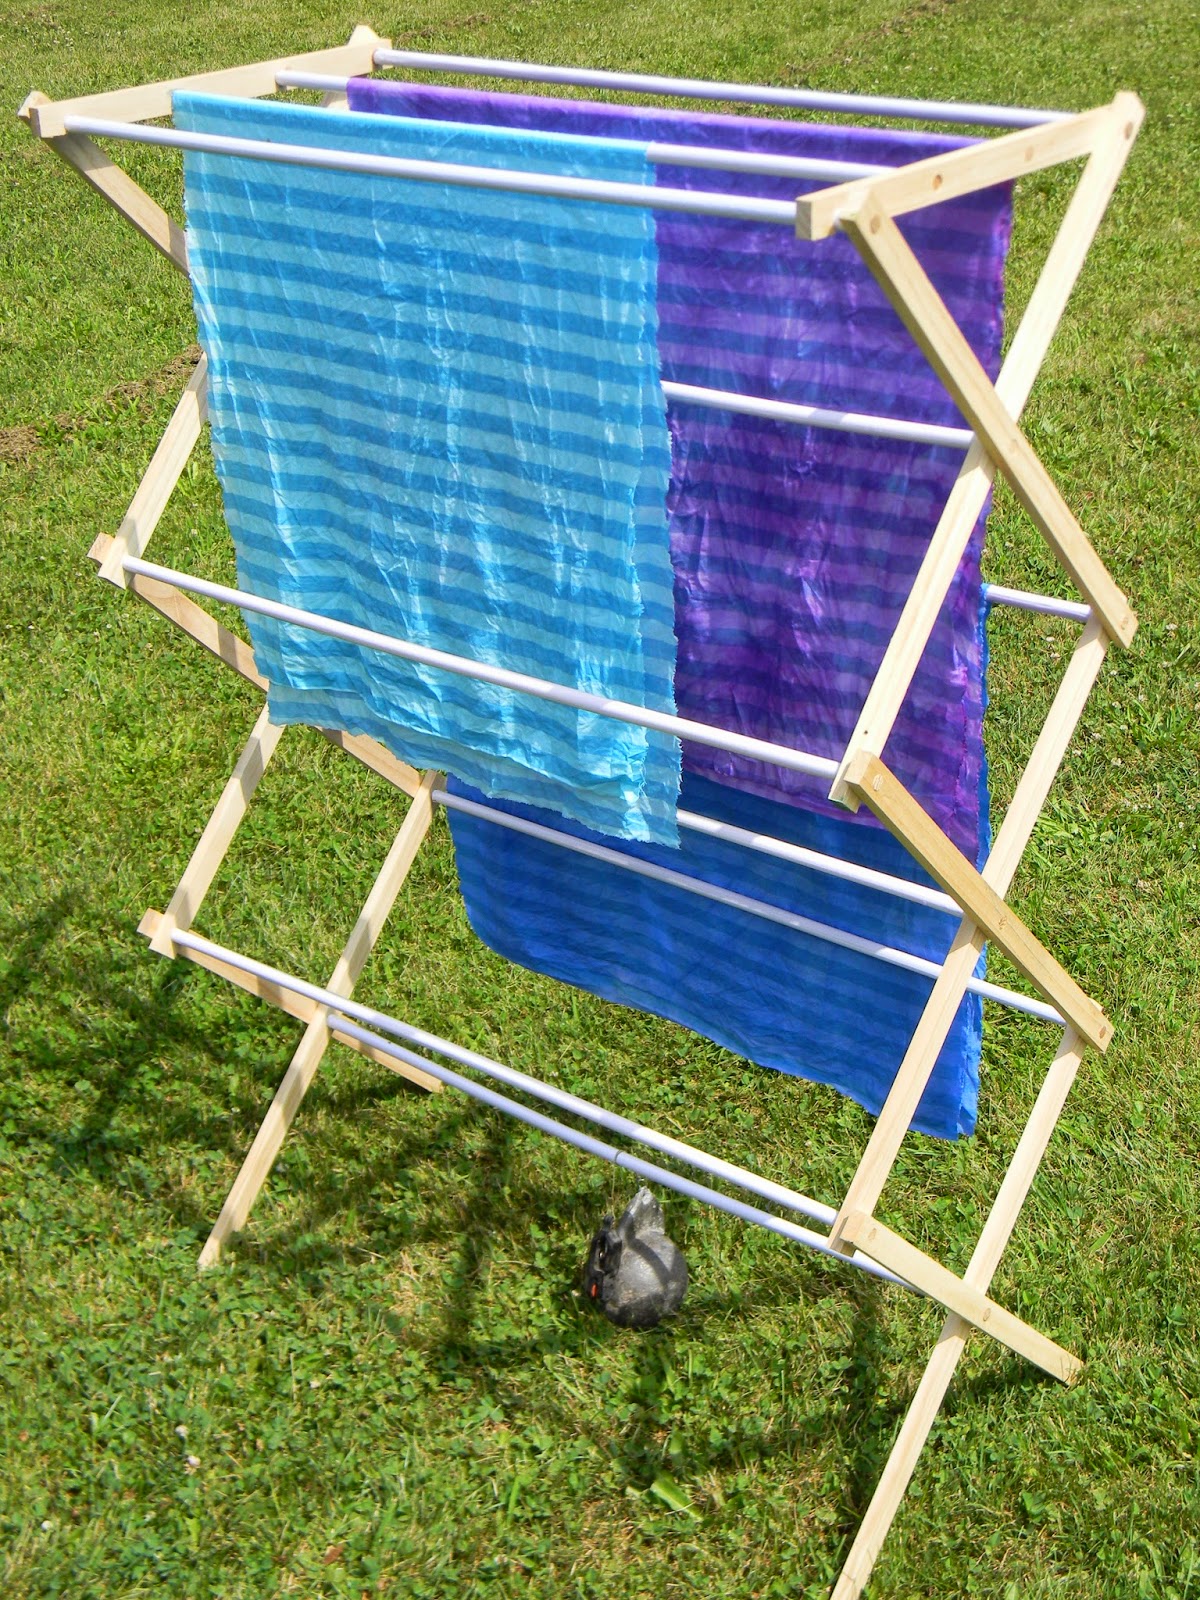
Then she hung them on this drying rack I got this spring at the thrift store.


I also found a striped sheet and she snagged that one.


It was neat to see how the stripes turned out in each color.

Note my husband's help in the picture below.

The rack kept blowing over so he hooked a very large fishing sinker to the bottom of the rack.


See it?

VERY LARGE....

Once she was finished with the dye, I dyed some things I wanted to do.

Coffee filters.


They fit perfectly in those ice cream buckets.


I leave the coffee filters in for 5 minutes or hours depending on how intense I want the color.


These were less than 15 minutes.


I put them over a tin to drip in the grass and then I hang them in my garage on a little rack by my sink.

They can stay there until they dry.

I also did a couple bags that I want to alter.


That purple is still pretty strong.

I like the splotchy look.


Then I did lace.

I recently bought yards and yards from a thrift store.


It is fun to see how the different laces take the dye in the same dye batch.

Green.


Purple.


I did lots in the purple.


You can see the synthetic lace takes the color differently than the natural fiber lace.


I love how these turned out.


Well, when my daughter gets her rug finished I will show it to you.

Thanks for stopping by....