Pages

Friday, January 30, 2015

Vintage Storage Ideas


I am lucky enough to have a studio.

It is my garage.

It is my space and I love it.

I love utilizing vintage finds for studio storage.

I thought I would share some of my favorite vintage storage from my work spaces.


Each works hard in its own way.

I store most little items for mixed media, jewelry and such in vintage mason jars.

I collect them whenever possible along with zinc lids for on them.

My cupboards are filled with them.


My husband found, bought, loaded and helped me clean this vintage card catalog.

It holds a ton of essentials. 

I love that I can change the contents and the tags in a minute.

  I can send my daughter to the studio to find something and she can quickly locate it.

Yay!

You have to love a piece that hard working.

I have been thinking maybe some day I will paint it...

I have always love little divided shadow boxes.

This one had some splits in some of the dividers so I did not want to use it for shows.

It makes the perfect home for my hand crafted polymer clay beads.

As I use them and make more, it looks different all the time.

Just seeing the beads inspires me to use them.


These fun little tins were thrifted finds.

I use and buy some tins to use in jewelry designs but these are perfect as is.

They are such a pretty way to store things.


Printer's trays are my kryptonite.

I have to buy them if they are reasonable and in good shape.

My daughter has pointed out more than once that I do not NEED any more.

She is right, of course.

They are so handy though.

I usually use them for booth displays but now I use them in the studio.


Bits and baubles are right there...


This little green drawer unit was last spring's splurge from Lucketts.

It also holds tons of essentials.


It helps me find things.

And it looks cool.


Old luggage makes great storage.

I love that these suitcases hold my yarn supply out of the way and keep it dust free.


These cases are also full of yarns and fibers.

They are missing their handles so this is the perfect use for them.


Last summer my daughter spray painted a vintage ceiling tile to use as a memo board.

This fun color really makes it pop.


My neighbor dropped off this rusty cart one day.

I transformed it into a great little storage piece.


I use this ceiling tin in my green house as a magnetic memo board.


This vintage box is the perfect booth display for bangle bracelets.


Wooden crates are both storage and booth display.


Is your studio space sleek and sophisticated or full of vintage storage pieces?

Thanks for stopping by....


Thursday, January 29, 2015

Guest Post over at Plucky's Second Thought...

I am fortunate enough to be a guest contributor over at Plucky's Second Thought.

You check out my newest post over there now.

It is a tutorial for this sweet polymer clay necklace  just in time for Valentine's Day.


Pop over to check it out and tell Jess I sent you...

Thanks for stopping by...

Wednesday, January 28, 2015

Soldering Glass Necklaces

  I am not an expert at soldering.

I am learning.

It is a technique I really love.

I wanted to share a few soldered glass necklaces.

This little glass ball started as a mini clear Christmas ball.


I love to fill these with little bits, baubles and trinkets.


 This little marble is fun.


It is a simple way to practice my skills.


I did the same thing with little glass pebbles.

These purple ones were pretty tiny.


These would be a great little gift for someone special....


Thanks for stopping by....

Tuesday, January 27, 2015

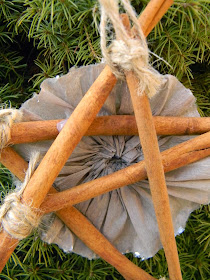
Crepe Paper Streamer and Cinnamon Stick Ornaments

You may remember before Christmas I did a couple cinnamon stick ornaments.

This one had a handmade wreath.


And this one had a little bleached bottle brush wreath.


The tutorial for making them is here.

Today I wanted to show you a few I made with crepe paper rosettes.

I must confess...I love rosettes.

When I start making them, I make tons.  

I use some right away and save some for projects down the road.

That is what happened here.


I have an extensive collection of colors.

Seems like that is something that frequently ends up at yard sales, thrift stores and flea markets.

I never pass up a roll or two at a good price.


To make mine, I actually hand sew the crepe paper.

I gently pull the thread to gather it and tie it off.


Then I glue the two ends together.


I give mine a spin in some glue and a roll in mica flakes.

I find the easiest way to do this is to place some white glue in a plastic container lid.

I hold the rosette so just the edge gets rolled in the glue.

Then the mica flakes are in another bowl I roll it in.

I find that to be the fastest and easiest way for me.


This crepe paper is actually two toned.

I die cut or punch a shape from vintage sheet music and roll the edges in glue and mica as well.


Sweet...


You can see this one has a mottled look on the sheet music...

One of those cool accidents.

I had these on my front covered porch waiting to be photographed.

We had some windy snow showers.


Apparently the snow blew in on these  and where they got wet, the color bled through from the crepe paper.


It happened to this one too.


This one actually has two different pieces of crepe paper sandwiched together.


I adore the vintage look of these pieces.

I hope you like them too...


Thanks for stopping by...

Linking up with these great blogs...

Monday, January 26, 2015

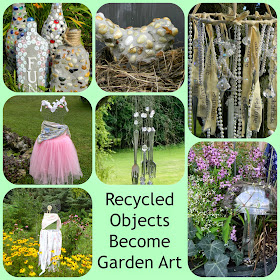
Recycled Materials Become Garden Decor


Are you thinking of warmer and greener days yet?

My favorite time to create is in the summer.

  I love to create outside in the sunshine.

I am planning my projects for warmer days.

I thought I would share a recap of some of my garden projects from last summer.

All of these are up cycled  from recycled materials.


I made a couple wind chimes.

This one looked great on my front porch.


Marbles, forks, beads, a flower frog, fishing line, and some plastic baubles all came together...


Reminds me of raindrops...


This fun and whimsical wind chime started with a lampshade skeleton.

You can read more about creating it here.

I sold this to a girl at my fall show last year.

She said it was sure to make her the favorite daughter since it perfectly matched her mother's style.

I hope it did...


I really enjoyed making it.


I am already planning another series of mosaic projects.

Last summer my daughter and I made a bunch of fun projects.

You can find the final post here.


Many of these were gifts to family and friends.

Everyone that received one seemed to genuinely love and appreciate them.


The one above went to my in-laws.

The tiles were retrieved by my father in law several years ago at an auction.

He chuckled at the memories.


This fun little bird was a ceramic bird from the dollar store.

She has found lots of homes around the garden every season.

I move her every so often.


This started with a gazing ball my friend gave me.


These glass mushrooms are sprinkled throughout the garden.

At a party we had, I had to smile at a friend who picked it up, examined it and showed it to his girlfriend...


The rebar keeps them upright and in place.

The tutorial for making them is here.


Chicken wire and a tomato cage became fun dress forms for the garden.

The post is here.


I love this one with the tutu.


This other gal got a raggedy strip skirt.


I plan to make a couple more variations of her for this year.

Wouldn't she make a pretty alternative to the typical garden scarecrow?

This gets me thinking about what to do this summer.

I hope you saw something that inspired you as well...

Thanks for stopping by....

Linking up with these amazing blogs.