Pages

Sunday, January 31, 2016

Buried Treasure Challenge

One of my very favorite blogs is Art Jewelry Elements.

I love that several of my favorite artists are gathered in one place and share things regularly that inspire me.

Recently Jenny Davies-Reazor challenged everyone to use some of our art bead stash.

This is right up my alley.

2016 is the year I dig into all the things I have been "saving".

This is why...


I have decided this little quote says it all.

So I dug into some beautiful components that Melinda Barnett sent me.

You can find her blog, Bees On Pie here.

I was saving them because they were so pretty.

She had sent these lovely clay disk components so I incorporated them into this necklace that has my hopes for the year.


Each disk is hand-stamped with a quality or characteristic like honesty, courage, peace, faith, health.

Things we might want or aspire to have or be.

I made a chain of my own wire heart links and added her components.

The two red bar pieces are from Melinda as well.


And then I finished it off with some silk.

I love silk.

I actually increased my stash of silk recently with a big order of luscious colors.


So this necklace will definitely be one of my favorite pieces this year.

I used components made by a dear friend.

I love the overall design.

It has my hopes for the year.

And it is a reminder to use the things you love.


I also made one more piece for the challenge.

This bracelet also uses a focal from Melinda Barnett.

I believe this one is made from paper clay. 

 It is very light and wearable.

I added my wire links and some silk that I hand dyed.


So that is a great beginning for a new year.

I hope you make something gorgeous with pieces you love as well.

Thanks for stopping by....

Tuesday, January 19, 2016

Craft Lightning Valentine's Edition

One of my favorite things to be a part of is the Craft Lightning Challenges.

Today I am tickled to be a part of the Valentine Edition.


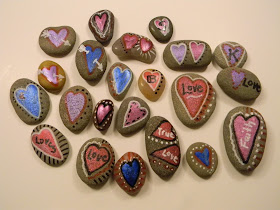
I made these sweet love rocks.


Let's gather some supplies.

It is bitter cold here so some of my photos had to be done inside where the lighting is not as good...

You will need:


rocks
paint brushes
paints
paint markers
paper plate

You can gather rocks from outside or buy a bag from the craft store or the hardware store.

I have some rocks from the craft store and some from the yard.

Wash them and allow them to dry thoroughly.

Paint your designs right on the rocks.


I like to do the larger parts of my designs with paint and then the details with paint markers.


You can personalize them.


I made this sweet little collection in about a half hour.


I plan to do a few sweet art abandonments with these...


Have you heard of art abandonment?

Artists all over the world are making beautiful things and leaving them places for others to find and enjoy.


You can leave them in a public place like a restaurant, hotel, park, shopping center, etc.

There are groups you can join.


You can print tags found on the page and add them to your abandoned piece.  

That way, the person that finds the art can comment on it.


I have some plans for these...

The local radiation center.

Parking lots.


On the ground outside a variety of stores.


Because everyone can use a little extra love....


Thanks for stopping by...

Monday, January 18, 2016

New Toy... and Melting Bottles With it...

Like many artists, I am forever on the quest to try new tools, toys and techniques.

This fall I made a long-time dream come true and bought myself a kiln.

I got a Delphi EZ Pro from a friend.

He is a gifted glass artist and wanted to upgrade to a larger kiln.

It will fire glass, ceramic clay and metal clays.

And it does not need 220.

Perfect for me.

So the fall has been a series of adventures in glass melting.


Most of what we have done have been experiments with scrap glass.


Today I wanted to share some of our bottle experiments.

I have 2 bottle molds and have tried slumping, tacking and full fusing a variety of bottles.

This is an example of a slump in a mold.


I added some fun little hardware bits.


There are a few air bubbles around them.

This does not bother me. 

 The metal holds the heat and cools at a different rate than the glass.


This was done in a bottle mold on the slump setting.


These can be used as trays for crackers, fruit, cheese, etc.


Many people on our gift list this Christmas got one of these.


This little brown bottle was a vintage bottle.

I melted it on full fuse just on the shelf.

I love the look the vintage glass has.

 What a sweet little resting spot this will be for a spoon or teabag.


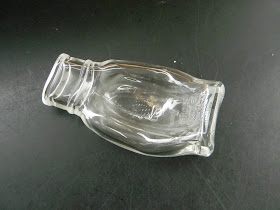
This bottle was a little too big for the mold.

You can see how it melted over the edge a bit.

I also filled this one with marbles and glass gems. 

 I loved the look inside the bottle.

My mother in law grabbed this one and uses it as a spoon rest and loves it.


The glass within the bottle cracks and has bubbles and such.

I like the unique look of it.


This was a little pink mason jar cup from the thrift store.

It was slumped right on the shelf, no mold.

The pink color was just painted on so it completely burned off during firing.


This is a Frappachino bottle done on the shelf, no mold, full fuse.


The last one to show you today was a little bottle with a bee and honey design.

I slumped it and you can still see the designs in the glass.

This will be a great gift for a tea drinker.


I will be sharing many more of my experiments.

Some have been successes and some have been failures.

What is new in your studio?

Thanks for stopping by....
Saturday, January 16, 2016

Leather and Polymer Clay Cuffs

The last couple months have been filled with lots of unexpected adventures.

I am still creating but much of it has been for specific projects that I can't share yet.

Today I wanted to share a few pieces that have been on my workbench.

These wrap braclets incorporate leather, silk and my own polymer beads.


I really love this cuff bracelet.

Very bohemian.

Although it does require a friend to help put it on.  


It has a wider leather base and then the silk and leather cord wrap around it to secure it.


This one has a thinner leather base, but it wraps around a few more times.


The silk is woven through the leather.


And the clay nest serves as both a focal and an essential part of the clasp.


What is on your workbench?

Thanks for stopping by....

Thursday, January 14, 2016

2016 ICE Resin Design Team

I am thrilled to announce that I am a member of the 2016 ICE Resin Design Team.


What does that mean?

It means for the next year, I have the opportunity to stretch my wings as an artist.

I have always loved working with ICE Resin and now I can really show some of the things that can be done with it.

I will be participating in a  number of challenges and blog hops this year as a member of the team.

The scariest part of the whole thing is that each project needs a video.

Gulp!

I am not a selfie/video kind of gal.

But I DO love to create and share with others how to do it so the end result is worth a little discomfort on my part.

Plus, pushing past a little fear can be a very good thing...

I am super excited to be a member, especially when I look at those who were members before me and alongside me this year.

We are talking some serious talent here, folks.

Be sure to hop over to the ICE Queen E-Zine to check out the whole team.

And watch for teasers here on the post of what you can do with ICE Resin...

Thanks for stopping by....