Pages

Thursday, July 31, 2014

Thrifty Thursday...Glass Mushrooms for the Garden....

A trip to the thrift store with my daughter yielded supplies for a quick garden project.

Thrift stores never seem to lack glass vases and glass bowls.

I picked up 5 of each.


I gave them a wash in the dishwasher.

It was a really hot, humid day when I did this.

You can see the glass steamed up when it came outside from the cooler house.


I used some of Beacon's 527 glue.


I put the bowls on the driveway and ran a line of glue around the raised edge of the bottom of the vase.

Then I just set each one in the bowl and let them sit until they were dry.


It took mine about 4-6 hours before I actually took them in the garden for placement.

I would recommend over night or longer just to be sure.


You may wonder why on earth I glued the vases that way...

I have a good reason.

I don't want them to keep tipping over.

I took a piece of rebar and pounded it in the flower bed with a hammer.


I slipped the mushroom on and we are good to go.


Even a heavy rainstorm or small animals running by won't tip these mushrooms over.


This would be a super easy kid's craft.

You could even paint the glass with glass paints.


I wanted the subtle clear look this time.


Since I made 5, I have plenty to go around.

I added a piece of rebar to the planter in front of the garage.


And the mushroom perfectly fills a little space there.


You may already have everything you need at home for this quick project.

Thanks for stopping by...

Linking up with these great blogs...

Tuesday, July 29, 2014

Bonus Points For the Husband!

My husband called from work at lunch time.

His friend had some things he was going to sell and thought I might be interested.

So I hopped in the car and headed over.

What did he have, you ask....

3 boxes of chandelier crystals...

I am not kidding.

Would I be interested?

YES!!!

I forgot to take pictures of the boxes before we unwrapped them.

But here they are after....


Lots of the long dangly ones.

I have never had any of these....

I am thinking they will make amazing Christmas ornaments.

And I am making a couple wind chimes for the fellow that sold them to me for his mom and grandma.

One whole box was the smaller pieces.


They are all pretty grubby.

They have been in those boxes for a very long time in someone's basement.

Since the 1950s or so....

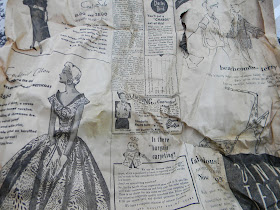
I know that because as I was unwrapping them I noticed the newspapers they were wrapped in...


They were almost as much fun as the crystals...


After we unwrapped them all, I read my husband the papers.  
Here are some of my favorites. 

 I did my best with the photos.  

They were so old and brittle.

 I really wanted to save them.

Let me show you some...


I wanted to show the date...June 1953 ...The Evening Bulletin from Philadelphia...

The article below was so sad...

The daughter supposedly stole a candy bar from the grocery  and Mom used a little too much corporal punishment to discipline her...


Check out the best sellers back then....


I love the old advertisements.

$4 for a dress!


There were also papers from Temple University from the late 1940s.

President Johnson welcomed the freshman class...


Old car advertisements...

No price...

 Love the picture....


Charm school for young women...

Can't say that would be a bad idea now.


This new-fangled dishwasher seems like more work to hook up and load and unload than washing the dishes would be.


Check out the headlines...


I wonder if someday our advertisements will make people nostalgic.


Those hats were quite the fashion statement.


Doesn't she look fancy?


Taking Arthur Murray dance lessons could make you popular on vacation...


New luggage, anyone?


Meat prices...


I saved my favorite for last.

A tuition increase for fall.

Ready for it?

$380!

Up $34 from last time.

If only.....


I flattened them all out and sandwiched them in a big book to try to save them.

The wrapping was as much fun as the crystals.

Good Job, Husband!

Mega points for you!

Thanks for stopping by...

Saturday, July 26, 2014

Pretty Upcycled bracelets

I often buy jewelry on clearance at the mall to reuse or take apart.

Often the pieces are cheaper that way than buying them at a craft store.

I love getting bangle bracelets.

They are super easy to alter.

These bangles were enameled so I did not want to completely cover the base.


I just glued buttons on this one with Beacon 527 glue.

As soon as they were dry (follow the glue directions), they were ready to wear.

This wide bangle was spruced up with these little flowers.

They were originally earrings from mall clearance as well.


I just pulled off the earring posts and glued them on as well.

Fun, Fast and Cheap.

Thanks for stopping by....

Friday, July 25, 2014

Finished Mosaics and tips and tricks for Mosaic-ing

This post will give you some of our best tips and tricks for mosaic-ing....


If you missed them, we showed you our mosaic-ing journey here and here.

We purchased some per-mixed grout and some sanded grout that needed to be mixed.

My daughter wanted to start right away so she opened the premixed grout to use on her coasters.

This did not go well.

She was very grumpy.

It was extremely sticky and difficult to spread evenly.

She used the word "HATE" a lot.

She grouted just a couple coasters.


The excess did not wipe off either.

To tile your bathroom, I am sure it is a great grout.

For what we wanted to do, it was just not working.

In the meantime, I was mixing the sanded grout.

I had to guess water amounts since I was not using the whole bag.


The grout I had calls for it to be mixed, then set for 10 minutes and be mixed again before using.


Pretty easy to do.

The spoon and spatula were purchased at the Salvation Army specifically for crafting.

We learned this is best done out in the grass.

My daughter added the seat cushion to the work station.

It was a great idea, although our dog tried to take it from her when she got up for a minute.


I really liked mixing my own grout so I could make it thicker or thinner depending on what was needed.

Here's the charger.


And the satellite dish.


The bottles were fun.

I prefer to just wear gloves and scoop and spread the grout with my hands.

Grown up mud pies.

Maybe that was why I did enjoy it so much.


Now, a couple tricks.....

Our grout recommended letting it sit for 30 minutes and then wiping it.

I did not do this with one batch.

It got very hard overnight and required using a brillo pad to scrub away the grout over the tiles and pebbles.


My daughter also did this with a batch of coasters but she is much more meticulous than I am so hers were already pretty clean and were not too bad to wipe.


I also preferred to wipe each item 2-3 times to remove the grit.  

I let them dry completely between wiping sessions.

I sprayed my finished pieces with Krylon Clear coat for some protection from the elements.


I gave each piece 2-3 coats of sealer. 

 Now here are the finished pieces...

The Bottles turned out great!


You can see I added letters to the empty strips.


The little tabs on the letters helped them to stick in the grout.


This bottle is my favorite.


It was the only one I did with an actual pattern.


These will make great garden accents....


My daughter's coasters turned out as well.

We did learn that all items need to be the same height or the glass won't sit evenly.


I love the pebbles....


Water anyone?


These are just too clever.

They will make great gifts for her techie friends....


These actually turned out to be some of my daughter's favorites when they were finished.


  The shells are another of my favorites.


They are all ready for drinks on the porch.


Here is the funny little bird that puzzled my husband. 

 He looks better now.


I am pleased with how the eggs turned out...

They will be fun to nestle in the garden... 

A hidden surprise.


The little gazing ball my friend gave me turned out...


And the idea that started the madness is actually one of my least favorite pieces.  

Go figure.


Excuse the crooked stump.

I did not want to run around looking for a shim.


Another tip that worked for us was to put the tile adhesive in a sandwich ziploc bag.


We just snipped the end.

Just a little bit.

This was actually too much.


Then squeeze the mastic out onto the piece being covered or the item being added.

My husband's suggestion...

We did learn something about what sponges to use as well.


The one on the left did not work well for us.

The cellulose sponge (green) worked well to wipe wet grout.

The fine orange one worked perfectly for the final wipes.  

I highly recommend having brillo pads on hand as well.

I would encourage you to give it a go.

It was very fun and addictive.

Thanks for stopping by....

We are linking up with these great blogs.